Arduino Button Library Extension (ABLE)
The Arduino Button Library Extension (ABLE) is a simple, lightweight button library with minimal memory requirements.
Motivation
The focus of AbleButtons is to consume minimal memory for the button capability required. This is important for embedded micro-controllers such as the Arduino Nano with only 32K Flash and 2K SRAM.
For example, the Buttonable sample has minimal overhead compared to the built-in Button example included with the Arduino IDE. The Debouncable example uses less program storage than the equivalent Debounce program provided with the Arduino IDE. See the memory use section later for more.
Introduction
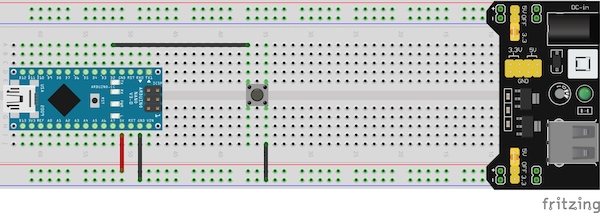
A simple program to control the inbuilt LED using a push-button is shown below. The pull-up resistor circuit for an Arduino Nano is:
#include <AbleButtons.h> // Include the library in your program.

// Identify which buttons you are using...
using Button = AblePullupButton; // Using basic pull-up resistor circuit.
using ButtonList = AblePullupButtonList; // Using basic pull-up button list.

#define BUTTON_PIN 2 // Connect button between this pin and ground.
Button btn(BUTTON_PIN); // The button to check.

void setup() {
  // put your setup code here, to run once:
  pinMode(LED_BUILTIN, OUTPUT);

  btn.begin(); // Always begin() each button to initialise it.
}

void loop() {
  // put your main code here, to run repeatedly:
  btn.handle(); // Always handle() each button in a loop to use it.

  if(btn.isPressed()) { // isPressed() is true when the button is pressed.
    digitalWrite(LED_BUILTIN, HIGH);
  } else {
    digitalWrite(LED_BUILTIN, LOW);
  }
}
AbleButtons provide a suite of button types so you can choose the best fit for your needs. By choosing the features you require at compile time, only the code necessary for those features is included. This helps reduce memory usage.
For example, if you do not use callback functions, using a button type without the callback feature reduces your program’s code size. For microcontrollers with small amounts of memory, it can be important to give you more space for your own project code.
Button selection is done with using Button = Able...Button and using ButtonList = Able...ButtonList style statements in your program. Switching button types is easily achieved by changing just these using statements.
See the button features and button types later.
Usage
The full button library documentation can be found here. The library also includes some examples to help get started.
In addition to selecting the button types you wish to use, you must initialise each button with a begin() call in your setup() function and handle() it in your loop() function.
If you have a ButtonList containing all your buttons, calling begin() and handle() on the list will call them for all the buttons.
Programs using AbleButtons are easy to read:
#include <AbleButtons.h>

using Button = AblePullupButton;
using ButtonList = AblePullupButtonList;

Button btn(2); // The button to check is on pin 2.

void setup() {
  // put your setup code here, to run once:
  pinMode(LED_BUILTIN, OUTPUT);

  btn.begin();
}

void loop() {
  // put your main code here, to run repeatedly:
  btn.handle();

  digitalWrite(LED_BUILTIN, btn.isPressed());
}
Toggling LEDs
The Debouncable example is also much easier to understand than the Debounce example included with the Arduino IDE.
#include <AbleButtons.h>

// Identify which buttons you are using...
using Button = AblePullupClickerButton;
using ButtonList = AblePullupClickerButtonList;

Button btn(2); // The button to check is on pin 2.
bool led = false; // The state of the LED.

void setup() {
  // put your setup code here, to run once:
  pinMode(LED_BUILTIN, OUTPUT);

  btn.begin();
}

void loop() {
  // put your main code here, to run repeatedly:
  btn.handle();

  if(btn.resetClicked()) { // Reset the click, indicating if it had been clicked.
    led = !led;
    digitalWrite(LED_BUILTIN, led);
  }
}
Callback Button
Here is another program using callback functions. It can be found in the ButtonableCallback example:
#include <AbleButtons.h>

// Identify which buttons you are using...
using Button = AblePullupCallbackButton;
using ButtonList = AblePullupCallbackButtonList;

// Declaration of callback function defined later.
void buttonableCallback(Button::CALLBACK_EVENT, uint8_t);

#define BUTTON_PIN 2 // Connect button between this pin and ground.
Button btn(BUTTON_PIN, buttonableCallback); // The button to check.

void setup() {
  // put your setup code here, to run once:
  pinMode(LED_BUILTIN, OUTPUT);

  btn.begin();
}

void loop() {
  // put your main code here, to run repeatedly:
  btn.handle();
}

void buttonableCallback(Button::CALLBACK_EVENT event, uint8_t id) {
  if(event == Button::PRESSED_EVENT) {
    digitalWrite(LED_BUILTIN, HIGH);
  } else {
    // Button begin and button released events.
    digitalWrite(LED_BUILTIN, LOW);
  }
}
Installation
NB: The initial version v0.1.0 of this library was called able-buttons but was renamed to AbleButtons at v0.2.0 due to significant changes in the code.
It is recommended to use the Arduino IDE’s library manager to find the AbleButtons library. This is the easiest approach.
To manually install this library, download the version you require and extract it into the Arduino libraries directory (normally the libraries sub-folder of the sketchbook folder - $HOME/Documents/Arduino/libraries)
With either installation approach, your libraries directory in your sketchbook folder should contain an AbleButtons directory with further files and sub-folders similar to the list below (additional files and directories may be present):
/AbleButtons
 |- /docs
 |- /examples
 |   +- /Buttonable
 |   |   `- Buttonable.ino
 |   `- /Debounceable
 |       `- Debouncable.ino
 +- /src
 |   +- AbleButtons.h
 |   +- Button.h
 |   +- ButtonList.h
 |   +- CallbackButton.h
 |   +- ...
 |   `- Pins.h
 +- library.properties
 +- LICENSE
 +- platformio.ini
 `- README.md
Memory Usage
The AbleButtons basic Buttonable example consumes 952 bytes of program storage (only 60 more than Arduino built-in Button example). It also uses 11 bytes for global variables (only 2 more than Button).
Sketch uses 952 bytes (3%) of program storage space. Maximum is 30720 bytes.
Global variables use 11 bytes (0%) of dynamic memory, leaving 2037 bytes for local variables. Maximum is 2048 bytes.
The AbleButtons LED toggling Debouncable example only uses 1110 bytes of program storage, which is 6 bytes less than the Arduino’s built-in Debounce example. It also uses 1 byte less for global variables.
Sketch uses 1110 bytes (3%) of program storage space. Maximum is 30720 bytes.
Global variables use 18 bytes (0%) of dynamic memory, leaving 2030 bytes for local variables. Maximum is 2048 bytes.
As your program becomes more complex to achieve its purpose, code efficiency will be an advantage with memory constrained devices such as the Arduino Nano with 32K for programs and only 2K for global variables.
Button Features
Button Debouncing
All AbleButtons (except Able...DirectButton types) support button debouncing.
Debounce logic addresses contact bounce common to mechanical buttons in your electronic circuits. Debouncing a button waits for a steady contact so the button does not appear to bounce between open and closed as it is pressed or released.
You can Button::setDebounceTime(ms) to control the time used to wait for a steady signal. The default 50ms is usually sufficient.
Direct Button Readings
The Able...DirectButton types read the pin signal directly without waiting for contact bouncing to stabalise.
With these buttons, isPressed() may bounce between true and false as the button is pushed and released. Normally debouncing is useful, but if your project handles it another way, then using the Able...DirectButton type can remove unnecessary debounce logic. This can dramatically reduce AbleButtons memory requirements.
Basic Push Buttons
All AbleButtons include simple push-button detection with the isPressed() method. This returns true when the button is closed (pressed) and false when open (unpressed or released).
Held & Idle Checks
All AbleButtons (except Able...DirectButon types) include “held” and “idle” checks via isHeld() and isIdle() methods. The isHeld() check returns true when the button is held closed. The isIdle() check returns true if the button has been left open. Both return false otherwise.
NB: If you connect a switch to the pin, the idle time is only counted when the switch is open not when it is untouched.
The time required for buttons to be held is controlled via Button::setHeldTime(ms) methods and time to become idle is controlled with the Button::setIdleTime(ms) method. The default held time is 1 second and idle time is 60 seconds.
Clicker Buttons
The Able...ClickerButton types detect button clicks. A click is the combination of a button-press followed by a button-release (completing the click).
The clicker-buttons have an isClicked() method in addition to isPressed(). When clicked, isClicked() returns true until resetClicked() is called. You can also use resetClicked() to determine if a button has been clicked. The resetClicked() call returns true if the button was clicked (so the click was reset). This makes detecting each click easy:
// ...
bool led = false; // Current state of the LED.
// ...
void loop() {
  // put your main code here, to run repeatedly:
  btn.handle(); // Always handle() each button in a loop to use it.

  if(btn.resetClicked()) { // resetClicked() is true only once when the button was clicked.
    led = !led;
  }

  digitalWrite(LED_BUILTIN, led);
}
Double-Clicker Buttons
The Able...DoubleClickerButton types detect button double-clicks. A double-click is two clicks in quick succession (within the Button::setClickTime(ms) setting).
The double-clicker buttons have an isDoubleClicked() method in addition to isPressed() and others. When double-clicked, isDoubleClicked() returns true until resetDoubleClicked() is called. You can also use resetDoubleClicked() to determine if a button has been double-clicked. The resetDoubleClicked() call returns true if the button was double-clicked (so the click was reset). This makes detecting each double-click easy:
// ...
bool led = false; // Current state of the LED.
// ...
void loop() {
  // put your main code here, to run repeatedly:
  btn.handle(); // Always handle() each button in a loop to use it.

  if(btn.resetDoubleClicked()) { // resetDoubleClicked() is true only once when the button was double-clicked.
    led = !led;
  }

  digitalWrite(LED_BUILTIN, led);
}
Since V0.4.0 of AbleButtons an isSingleClicked() can be used to check for exclusive single-clicks. This avoids isClicked() returning true for the first click in a double-click sequence. A companion resetSingleClicked() is provided that returns true if an exclusive single-click was reset.
Callback Buttons
A callback button will call you back using a user-supplied function when button events occur. You define a callback function and provide it to the button when defined.
You can also setCallback(callbackFunction) to change the callback function used by a button in your program.
Your callback function takes two parameters - an event code and button id. It should have the following definition:
void myCallbackFunction(Button::CALLBACK_EVENT event, uint8_t id) {
  // ...
}
The function name can be anything, but it should accept two arguments - the event code and button id.
The event code identifies the event. Callback buttons support different event codes. Callback functions should ignore codes not used, or not recognised (later versions of AbleButtons may include additional event codes).
The following events occur for all callback button types:
- The
BEGIN_EVENTis called when thebegin()function is called. - The
PRESSED_EVENTis called once when the button is pressed. It is not called repeatedly when the button is held down. - The
RELEASED_EVENTis called once when the button is released. It is not called repeatedly when the button is unpressed. - The
HELD_EVENTis called when a button has been pressed longer than theButton::setHeldTime()duration. - The
IDLE_EVENTis called when a button has been released longer than theButton::setIdleTime()duration.
New in V0.4.0:
- The
SINGLE_CLICKED_EVENTis called when a button is clicked. For the DoubleClickerButton, it is only sent when the button is exclusively clicked and not when a double-click is sent. - The
DOUBLE_CLICK_EVENTis called when a button is double-clicked (DoubleClickerButtons only). When sent, theSINGLE_CLICKED_EVENTis not sent beforehand.
Your callback function also receives the id of the button. This id allows a shared callback function to differentiate between each button. A ButtonList::button(id) method retrieves the button based on the id provided.
Combined Features
Some features are combined. For example, the AblePulldownCallbackClickerButton and AblePullupCallbackClickerButton types combine “callback” and “clicker” capabilities if required.
Resistor Circuits
All AbleButtons (including the direct button) support pull-up and pulldown resistor circuits. Whether your circuits use pull-up or pulldown resistors is chosen at compile time. Ideally use the same (pulldown or pull-up) resistor circuit for all buttons.
Pulldown Resistors
With a pulldown resistor circuit, the signal is “pulled down” to ground (0v) when the button is open (not pressed). When closed (pressed), the button signal will go “high”.
See how to wire and program a button for a pulldown resistor circuit.
Pull-up Resistors
With a pull-up resistor circuit, the signal is “pulled high” (to +ve) when the button is open and low (0v) when closed.
Pull-up resistor circuits include using the internal pull-up resistors in an Arduino. These internal pull-up resistors make it easy to connect a pin to ground through a button or switch.
The following circuit uses the internal pull-up resistor for a button connected between pin 2 and ground:
Button Types
Different AbleButtons can be used by a name that represents the combined features required. The following button combinations are available from AbleButtons:
| Using | Resistor | Pin | Callback? | Button List |
|---|---|---|---|---|
AblePulldownButton | Pulldown | Push | No | AblePulldownButtonList |
AblePulldownCallbackButton | Pulldown | Push | Yes | AblePulldownCallbackButtonList |
AblePulldownClickerButton | Pulldown | Click | No | AblePulldownClickerButtonList |
AblePulldownCallbackClickerButton | Pulldown | Click | Yes | AblePulldownCallbackClickerButtonList |
AblePulldownDirectButton | Pulldown | Direct | No | AblePulldownDirectButtonList |
AblePulldownDoubleClickerButton | Pulldown | Double-Click | No | AblePulldownDoubleClickerButtonList |
AblePulldownCallbackDoubleClickerButton | Pulldown | Double-Click | Yes | AblePulldownCallbackDoubleClickerButtonList |
AblePullupButton | Pull-up | Push | No | AblePullupButtonList |
AblePullupCallbackButton | Pull-up | Push | Yes | AblePullupCallbackButtonList |
AblePullupClickerButton | Pull-up | Click | No | AblePullupClickerButtonList |
AblePullupCallbackClickerButton | Pull-up | Click | Yes | AblePullupCallbackClickerButtonList |
AblePullupDirectButton | Pull-up | Direct | No | AblePullupDirectButtonList |
AblePullupDoubleClickerButton | Pull-up | Double-Click | No | AblePullupDoubleClickerButtonList |
AblePullupCallbackDoubleClickerButton | Pull-up | Double-Click | Yes | AblePullupCallbackDoubleClickerButtonList |
The classes above identify the features available with them. Remember to identify which button type you are using:
// Identify which buttons you are using...
using Button = AblePullupClickerButton; // Using the clicker button on a pull-up resistor circuit.
using ButtonList = AblePullupClickerButtonList; // Using a button list for the same.
Button Lists
For programs with several buttons, AbleButtons provides a ButtonList feature. A program can define a list of buttons and then manage them together. Buttons still work independently (each with its own pressed, clicked and callback functions), but you can call the ButtonList::begin() and ButtonList::handle() method to manage all the buttons together.
The DebouncableAny example shows how you may use ButtonLists:
#include <AbleButtons.h>

// Identify which buttons you are using...
using Button = AblePullupClickerButton; ///< Using clicker pull-up button.
using ButtonList = AblePullupClickerButtonList; ///< Using clicker pull-up button list.

#define BUTTON_A_PIN 2 // Connect button A between this pin and ground.
#define BUTTON_B_PIN 3 // Connect button B between this pin and ground.

Button btnA(BUTTON_A_PIN); // Primary button.
Button btnB(BUTTON_B_PIN); // Secondary button.

// Array of buttons for ButtonList.
Button *btns[] = {
  &btnA,
  &btnB
};
ButtonList btnList(btns); // List of button to control together.

bool led = false; // On/off state of the LED.

void setup() {
  // put your setup code here, to run once:
  pinMode(LED_BUILTIN, OUTPUT);

  btnList.begin(); // ButtonList calls begin() for each button in the list.
}

void loop() {
  // put your main code here, to run repeatedly:
  btnList.handle(); // ButtonList calls handle() for each button in the list.

  // resetClicked() on ButtonList clears clicks on all the buttons in the list,
  // returning if any one of the button was clicked. Resetting the clicks
  // ensures clicks are handled only once.
  if(btnList.resetClicked()) {
    led = !led;
    digitalWrite(LED_BUILTIN, led);
  }
}
Mixing Button Types
If you have multiple buttons with different requirements it is recommended to use the same button type for all. This allows you to manage all your buttons in a single ButtonList (all buttons in the list must be of the same type). It also avoids including duplicate code for the different button types.
For example, you have two buttons - one only requires push-button detection and the other clicked detection. The following code would be recommended:
#include <AbleButtons.h>

using Button = AblePullupClickerButton; // Clicker buttons also detect simple presses.
using ButtonList = AblePullupClickerButtonList; // Button list for the same.

#define PUSH_BUTTON_PIN 2 // Connect your push-button between this pin and ground.
#define CLICK_BUTTON_PIN 3 ///< Connect your clicker-button between this pin and ground.

Button pushButton(PUSH_BUTTON_PIN); // Your push-button.
Button clickButton(CLICK_BUTTON_PIN); // Your clicker-button.

/// Array of buttons for ButtonList.
Button *btns[] = {
  &pushButton,
  &clickButton
};
ButtonList btnList(btns); ///< List of button to control together.

void setup() {
  // put your setup code here, to run once:
  pinMode(LED_BUILTIN, OUTPUT);

  btnList.begin(); // You must always call begin() once for each button.
}

void loop() {
  // put your main code here, to run repeatedly:
  btnList.handle(); // You must always call handle() repeatedly in a loop.

  if(pushButton.isPressed()) { // Just using basic push-button features...
    digitalWrite(LED_BUILTIN, HIGH);
  } else {
    digitalWrite(LED_BUILTIN, LOW);
  }

  if(clickButton.resetClicked()) { // Using clicker-button features...
    digitalWrite(LED_BUILTIN, HIGH);
    delay(1000);
    digitalWrite(LED_BUILTIN, LOW);
  }
}
Troubleshooting
AbleButtons is very simple to use. If your program is not working, check the following:
- Remember to choose the button with the resistor circuit and features you are using. See button features and button types for details.
- Signals from pulldown and pull-up resistors are different.
AbleButtonsneeds to know which one to use. Arduino microcontrollers have internal pull-up resistors, so connecting a pin to ground via a button uses a pull-up resistor circuit. - Choose the button features you need from
AbleButtons. A basic push-button, a clicker and callback functions. - Only use included features in your code. Compiler errors and warnings will occur if you try to use features not included. For example, errors occur if you try to use the clicker-specific methods (e.g.
isClicked()andresetClicked()whenusing Button = Able...Buttonwithout “Clicker” in the name. - Remember to
begin()each button in yoursetup()function andhandle()each button in yourloop()function. If you are using aButtonList, you can call thebegin()andhandle()methods on the list. - If using a
ButtonList, remember to include all your buttons in the list. For this reason it is best (and most memory efficient) to have the same resistor circuit for all your buttons. - If you need different features for different buttons, you should be
using Button = Able...Buttonwith the highest feature set you need over including both feature sets, otherwise duplicate code will be included. See mixing button types for details.