Terminator T-800 Rifle Modification
A rifle modification for the Agora/Hachette T-800 1:2 size Endoskeleton model. This modification brings the standard (silent) gun to life with a number of options:
- Random fire with realistic sounds and muzzle flash.
- Optional Laser Pen addition to create phased plasma effect. NB: Do not fit if using the gun as a toy. Lasers can damage eyes if fired into the face!
- Optional trigger to control manual firing.
- Optional motion detection to automatically fire.
See the following video for an example of automatic random firing with phased plasma bolt effect (smoke/humidifier required for laser visibility).
Instructions
Mandatory Parts
NB: I do not endorse any of the supplier links here. These are what I used. You may have better sources.
-
Arduino Nano. I used one from Ebay but also ran some tests using an official one from somewhere like The PI Hut which is much more expensive (but has pins soldered so works well on a breadboard).
-
Adafruit Sound Board to store and play the gun sounds and an Adafruit 2.5W Amp to connect the sound board to speaker. There is also an integrated version but it only has 2Mb memory and the 9 sounds are stored as WAV files (for immediate playback) and are about 4MB in size.
-
A speaker. I used this 4 ohm 3 watt one as it’s quite thin. Be aware of “normal” speakers - they won’t fit into the gun chamber.
-
Red Superbright LEDs. I used these from Ebay
-
Blue Superbright LEDs. I used these from Ebay. Mixing blue and red together makes a brighter purple than Purple LEDs.
-
Resistors to protect the LEDs from full voltage. The Arduino puts 5v to each IO pin which is too much for LEDs. Different colours require different voltages. Using 5v supply from the Arduino, 2v (mid-range) forward voltage and 15mA (low) forward current gave me 200 ohm which would extend the life of red LEDs. Using the maximum voltage and current (2.1v, 30mA) gives 100 ohm which will be brighter. I used some 100 ohm I already had as the LEDs flash rather than illuminate permanently. Ebay have many suppliers.
-
Some AWG 24 wiring to connect things together. Either multi-core or solid core. These options provide much more than required, depending on your needs. You can also use Dupont cables to minimise soldering but they can be prone to disconnecting when you fit them into the gun. I ended up using a mixture.
-
Some Heat Shrink tubing. I bought this example on Amazon which is good. Alternatives from Ebay might be cheaper. Again much more than you need, but could be useful for other projects depending on your needs.
-
A power source. Initially I used 4 x 1.5v AAA batteries, holder and connector cable, but they’re quite heavy. See the alternative parts below.
-
A switch to control whether the Arduino Nano is on or off. This one on Ebay matches the main on-off switch of the base.
-
Clear Acryllic to fit in the gun muzzle and hold the LEDs.
You will also need a soldering iron and some solder to connect things together. Additionally a hot-glue gun from HobbyCraft will help glue things into place. I used blutac initially whilst trying to position everything. Replace with hot glue once you are happy with positioning.
Alternative Parts:
- I eventually used an Adafruit PowerBoost 500 Charger and LiPoly Battery. They’re lighter and can be recharged without opening up the gun. Make sure you match the +/-ve polarity. You may need to rewire to match using something like these Micro JST wires.
NB: Be careful cutting LiPoly wires. Cut each wire one at a time and never short the 5v to ground (e.g. by cutting both together with metal wire cutters). Shorting takes no time to burn the circuitry of the battery out. Prolonged shorts can make the battery burst into flames.
Optional Parts:
-
A Laser Pen. You will need to dismantle it to get at the actual diode inside.
-
A TIP120 Darlington Transistor to control the power to the laser pen. You cannot draw enough power from the Arduino IO pins to create a reasonable laser. The TIP120 transistor allows the Arduino to switch power to the laser directly from the power source.
-
A resistor for the TIP220. I used these 2.7K-ohm from EBay to limit the Arduino IO pin output.
-
Tactile button switch like this one to fit behind the trigger in the rifle handle. A Dremel and hot glue is required to make space in the rifle’s handle.
-
PIR Sensor if you want the rifle to fire automatically when movement is detected.
Wiring diagram
The t800-rifle program for the Arduino supports LEDs, a laser pointer, trigger button and PIR sensor. I was also working on the HC-SR04 but it’s quite bulky. The PIR works pretty well in my view.
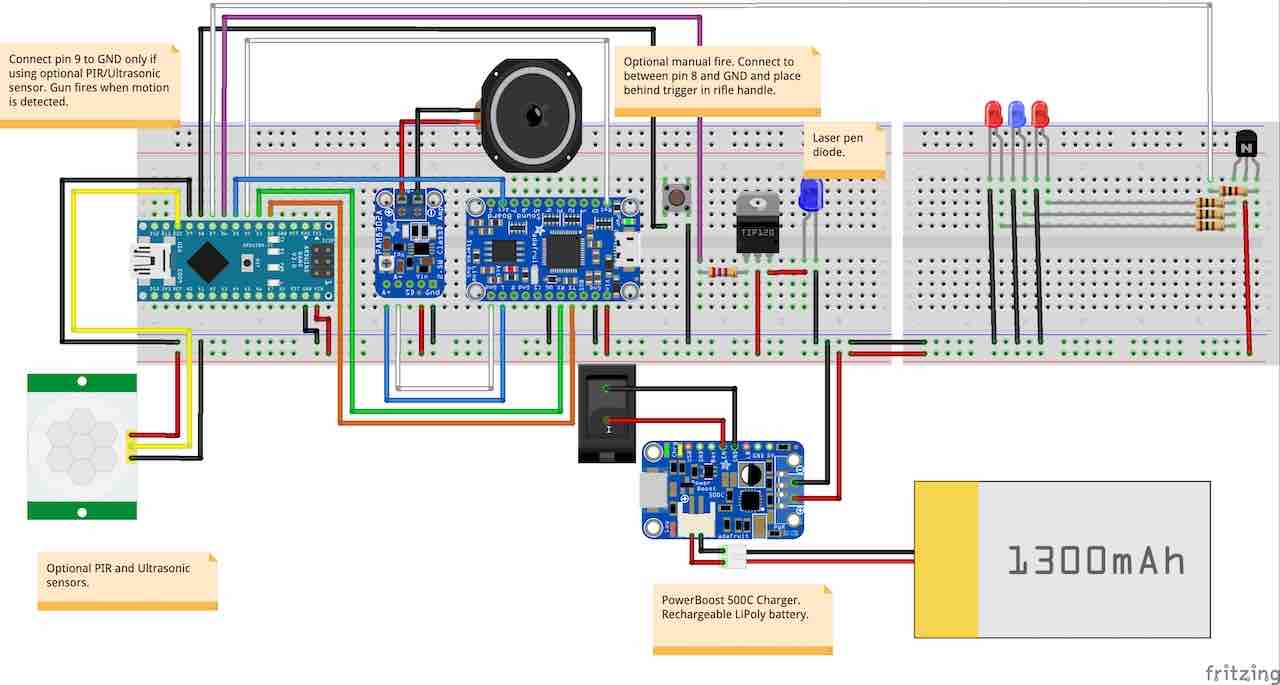
A breadboard is useful for setting it all up to ensure you have the correct wiring before soldering it all together. Dupont cables can be helpful here. I started with the ELEGOO Mega R3 Project Kit if you want to play with electronics. It’s expensive but contains lots of parts I can use on other projects.
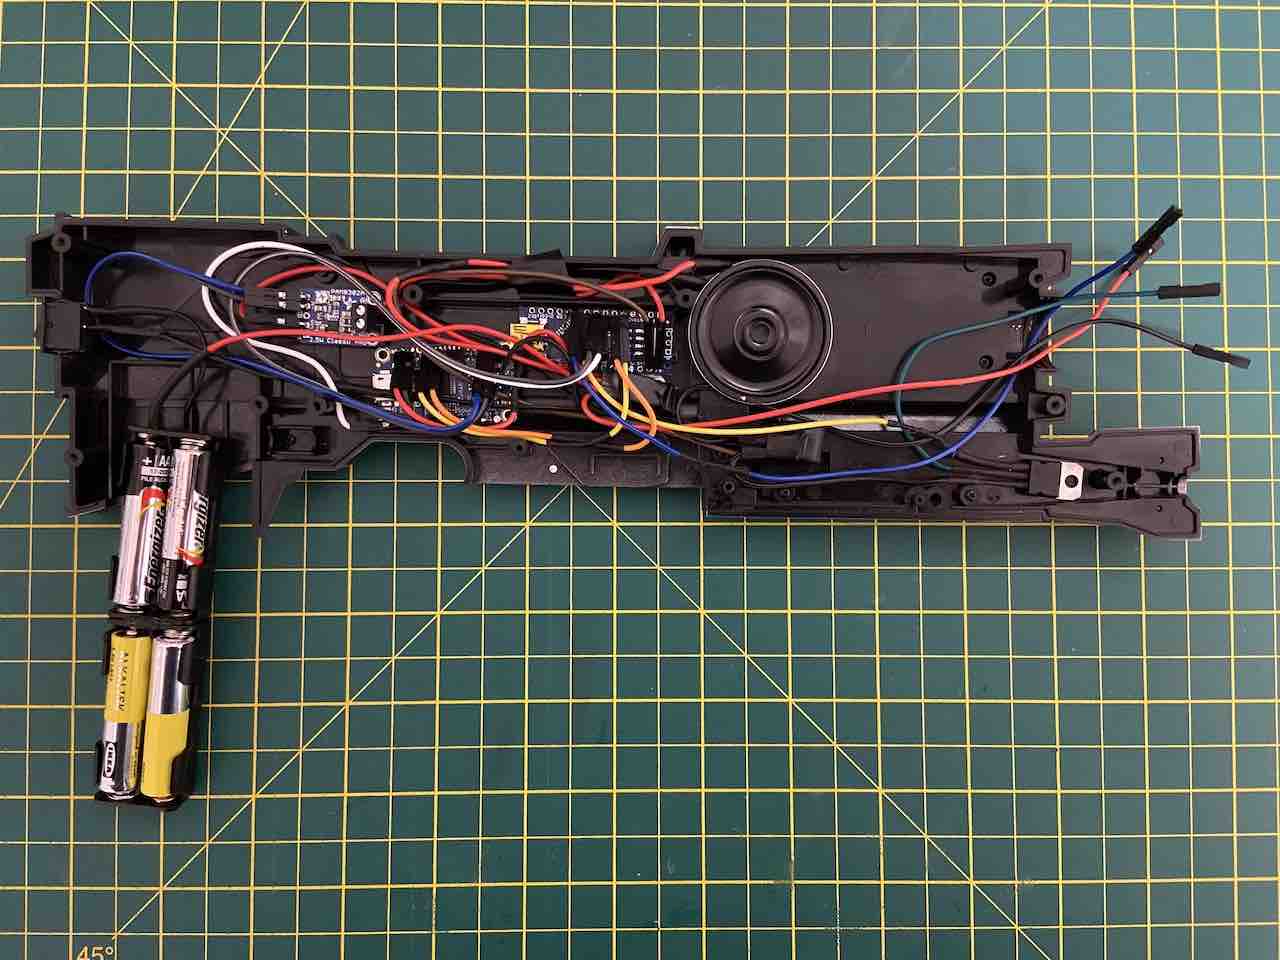
Fitting Electronics
You can see from the picture and video how the electronics can be fitted into the gun chamber. I started with 4 x AAA batteries, but they’re quite heavy (as is a 9v battery) and pushes the electronics to the front of the rifle. This may put unnecessary weight when held by the endoskeleton.
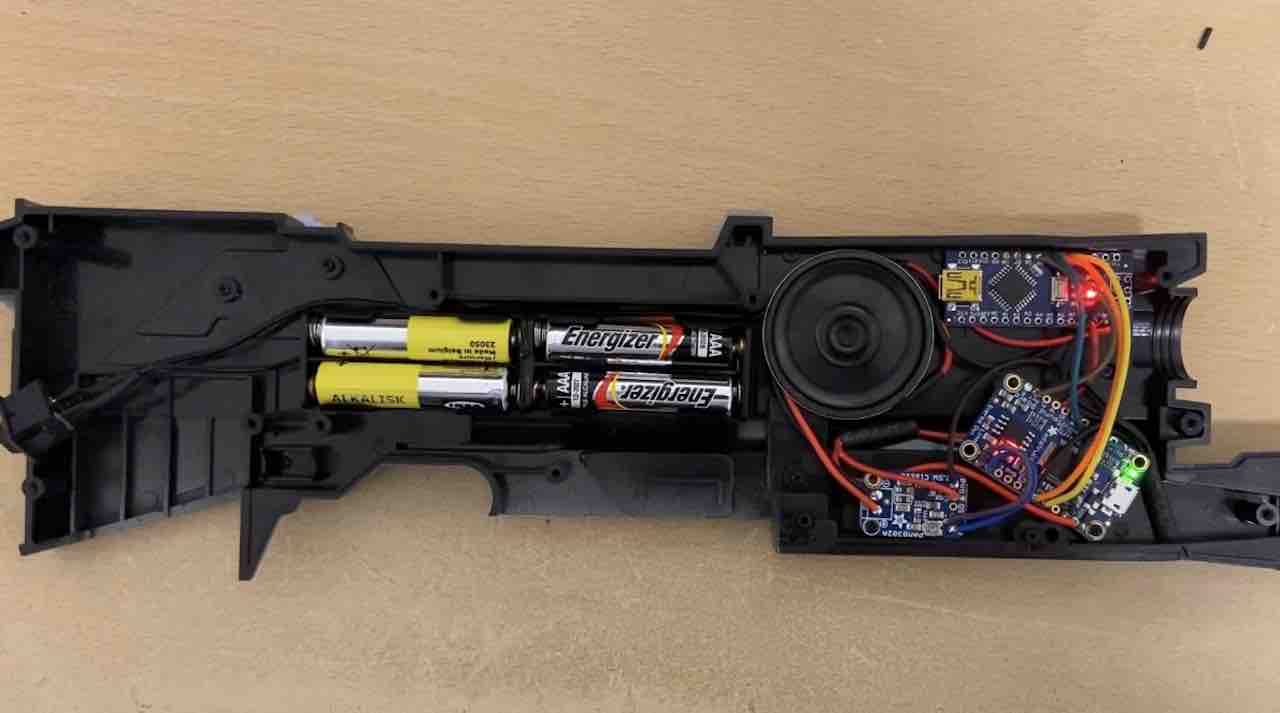
I reengineered to use a LiPoly battery and charger to reduce the weight and also so I didn’t have to open up the rifle when the batteries are drained. A USB cable can be fitted plugged into the charger by removing the power clip at the back. See the charger with a blue light and the USB connector pointing downwards:
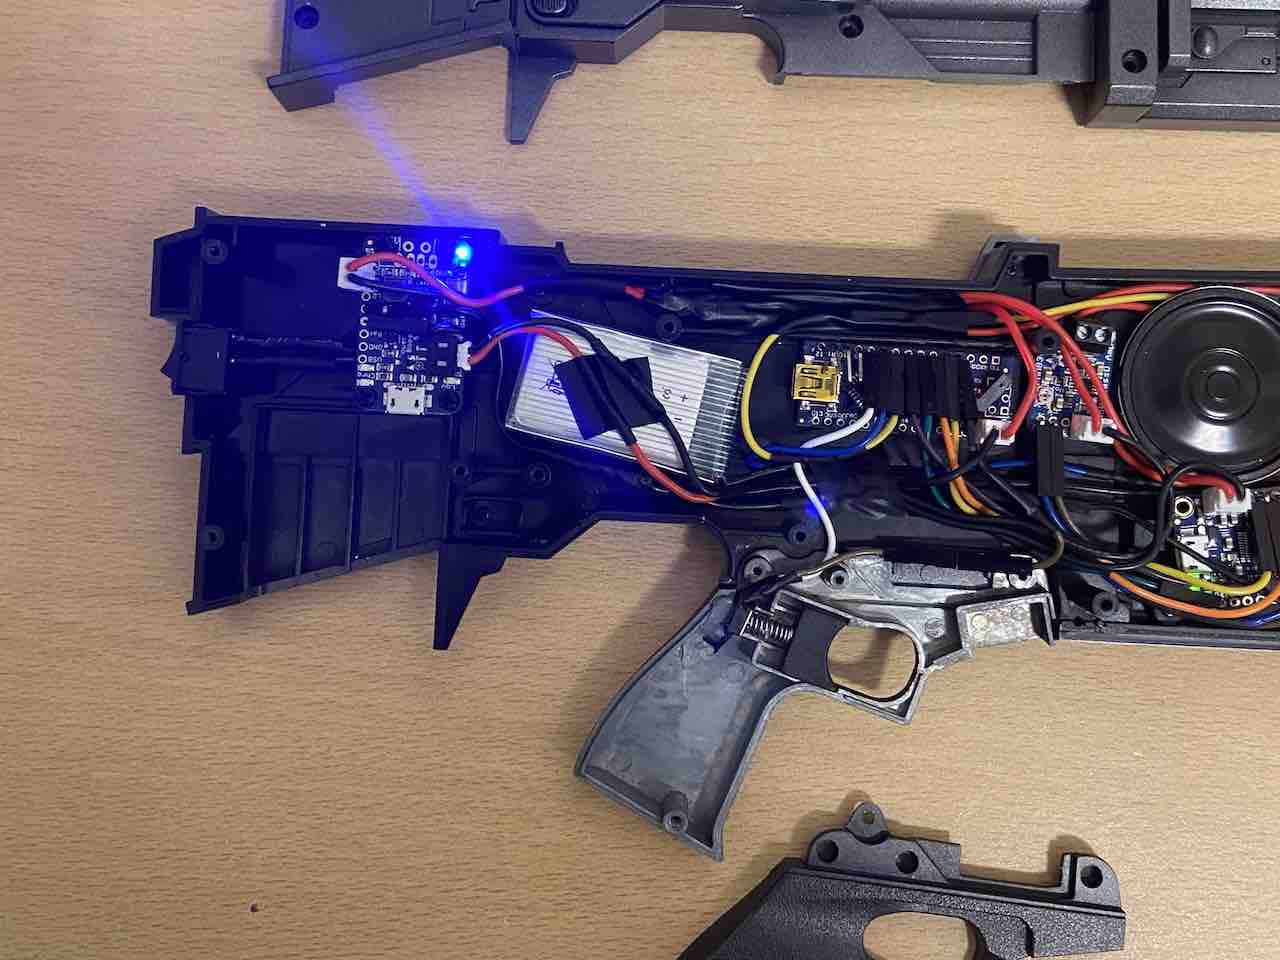
The video below shows the push button fixed behind the trigger and the LiPoly version. You can see more electronics are behind the handle, making the rifle more balanced.
Once the electronics are put together the gun fires randomly, but pulling the trigger can make it fire manually. Power off/on again to return to random fire.
The Arduino Nano needs programming first in order to control its behaviour…
Programming
Programming the Arduino Nano requires some tools. The program can be found on GitHub. To program your Arduino you will need to follow a few steps:
- Use the Arduino Getting Started Guide to install the Arduino IDE.
- I use Visual Studio Code and PlatformIO for a better programming environment (which needs the Arduino IDE too). If you also have VS Code and PlatformIO you can open the project directly in VS Code.
- Download the t800-rifle program from GitHub.
- Once you understand how to load simple programs (from the getting started and tutorials) to an Arduino Nano, you can load this modification program to control the LEDs. I would recommend trying out the standard “Blink” program first to ensure you can in principle compile and transfer it to the Nano. Ardunio basics are beyond the scope of this page, but there is plenty of help available via Google.
- If you only have the Arduino IDE, do the following to compile and load this modification’s program:
- Create a new project
't800-rifle'and copy the following files from the GitHub project into it: src/main.cpp(Delete and rename this to the maint800-rifle.inofile in your project)src/t800rifle.cppsrc/diags.cppinclude/diags.hinclude t800rifle.hinclude/ver_info.h- You must delete the original
t800-rifle.inofile and renamemain.cpptot800-rifle.ino - The Arduino IDE should now be able to compile and transfer the program to the Nano.
- Create a new project
- The rifle only uses the SoftwareSerial inbuilt library. If you want to try enabling the ultrasonic sensor too, you will need additional libraries (SR04).
Check out the Arduino IDE for a little ‘easter egg’…
You will also need to load the WAV files into the sound card.
Sound Effect Files
The sounds folder in the above project contains .m4a files for various muzzle flashes. Also a script m4a2wav.sh which creates Tnn.WAV for each nn.M4A file. WAV files take up more space, but play faster on the AdaFruit SFX board.
Run the m4a2wav.sh script to create the T*.WAV files and then copy them to the AdaFruit SFX board as specified in the documentation.
The script wav2sfx.sh and wav2sfx.cmd copy the T*.WAV files to the Adafruit SFX board. Note that Mac OS (un)helfully creates a .fseventsd file when the SFX board is mounted which can mess up with directory entry positioning. File are assumed to be copied in sequence so file directory entry 0 is T00.WAV, entry 1 is T01.WAV etc.
Even if you delete .fseventsd, it takes entry 0 in the directory, so Adafruit plays the wrong file.
Only reliable solution I found ATM is to mount the USB on Windows, delete all the files and use the Windows script to copy the files one by one in order.
Or use Linux if available to do the same.
If somehow the SFX board file system gets messed up, follow these instructions to wipe the card. Note reformatting with the normal operating system format commands will likely render the file system unreadable by the SFX board itself. I also found you need a decent USB cable otherwise it will corrupt the card.
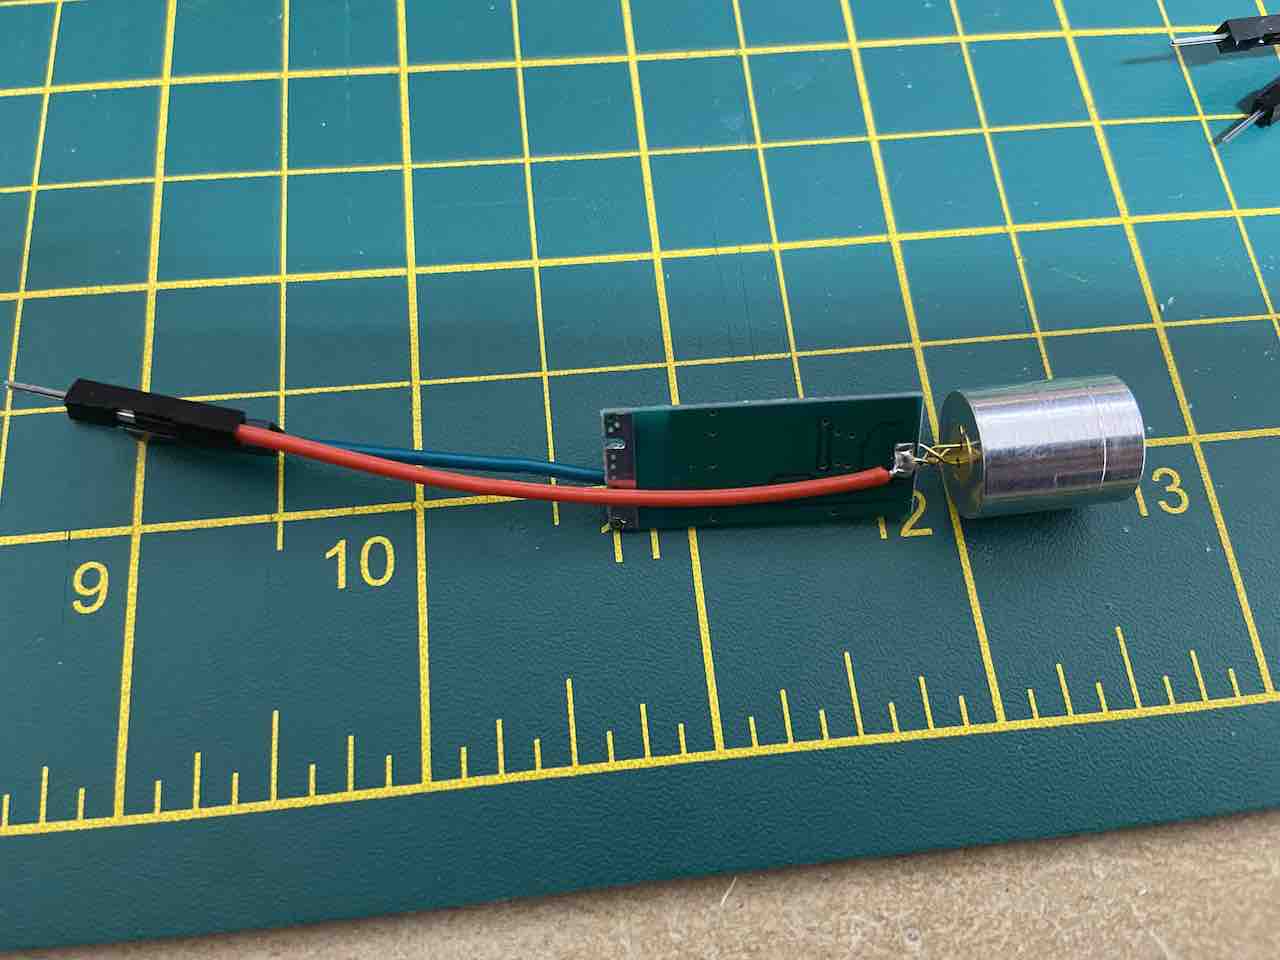
Building the Laser
NB: Do not fit if using the gun as a toy. Lasers can damage eyes if fired into the face!
I would suggest only doing this if you have an aptitude for electronics. You will need to dismantle the laser pen to remove the electronics and then solder resistors, along with red and blue LEDs.
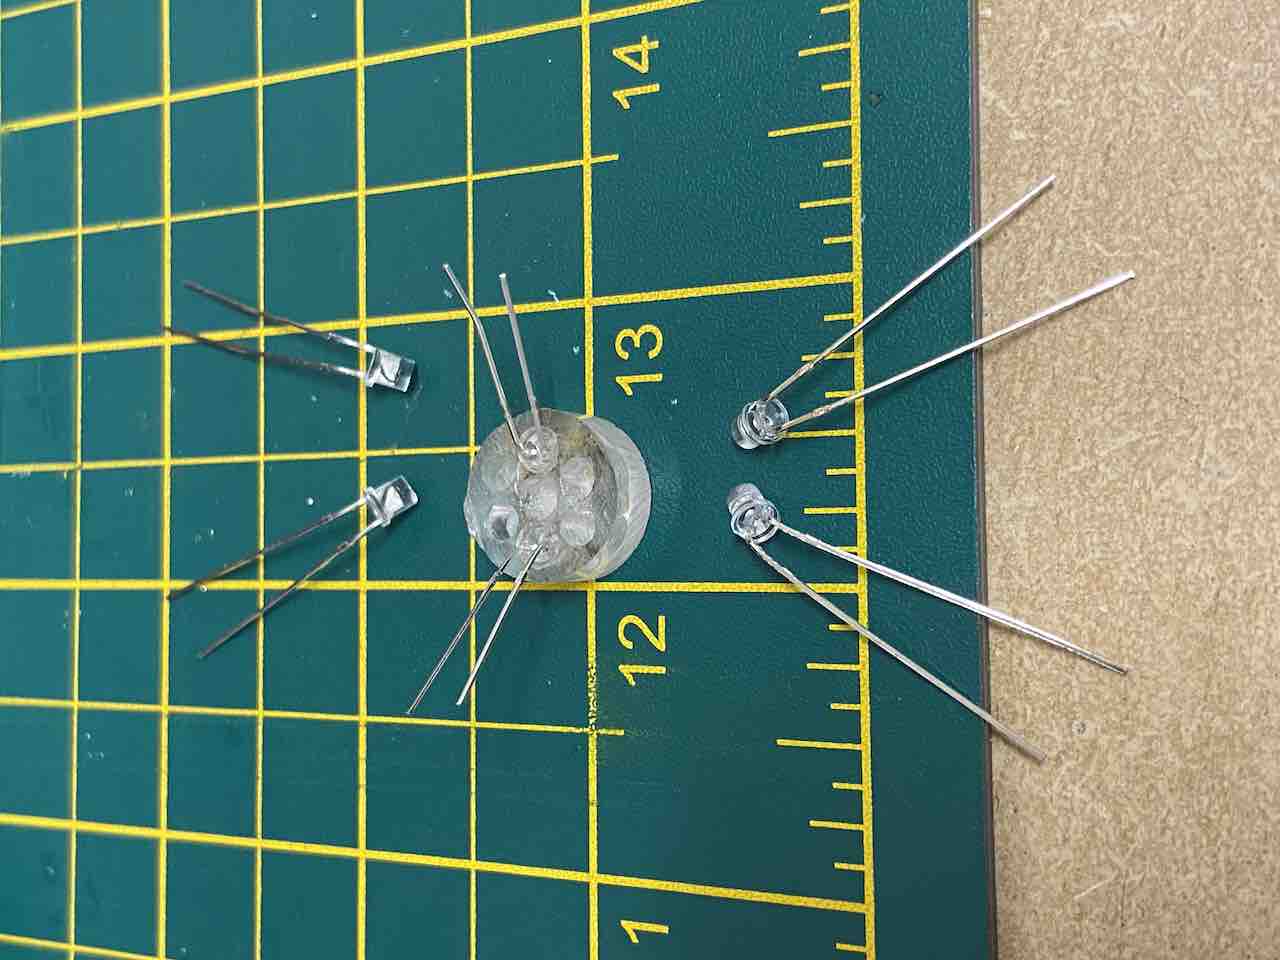

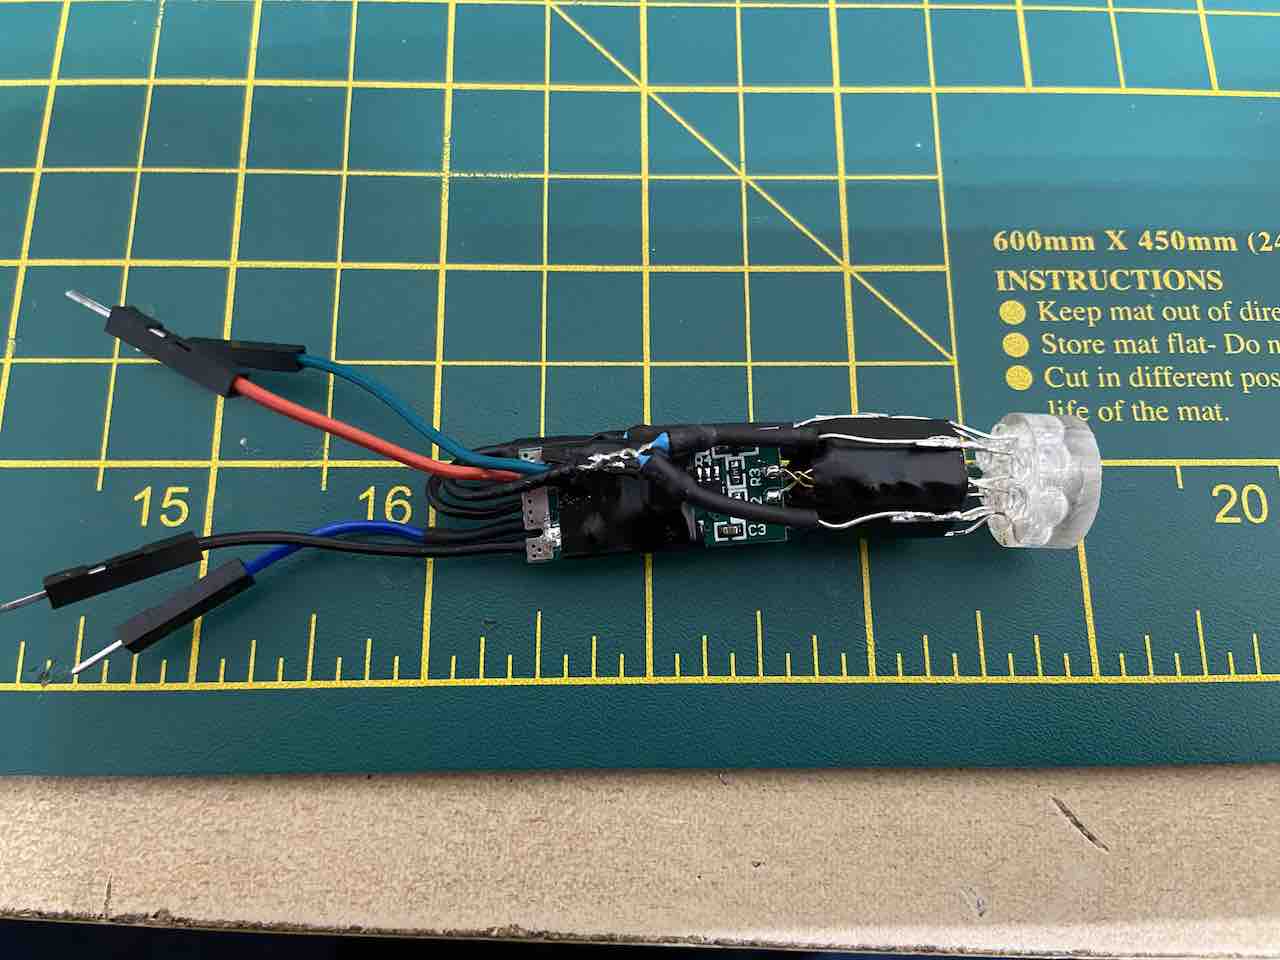
- Glue 2 red LEDs for each blue into the acrylic to make purple.
- Wire a transistor to control the LEDs together.
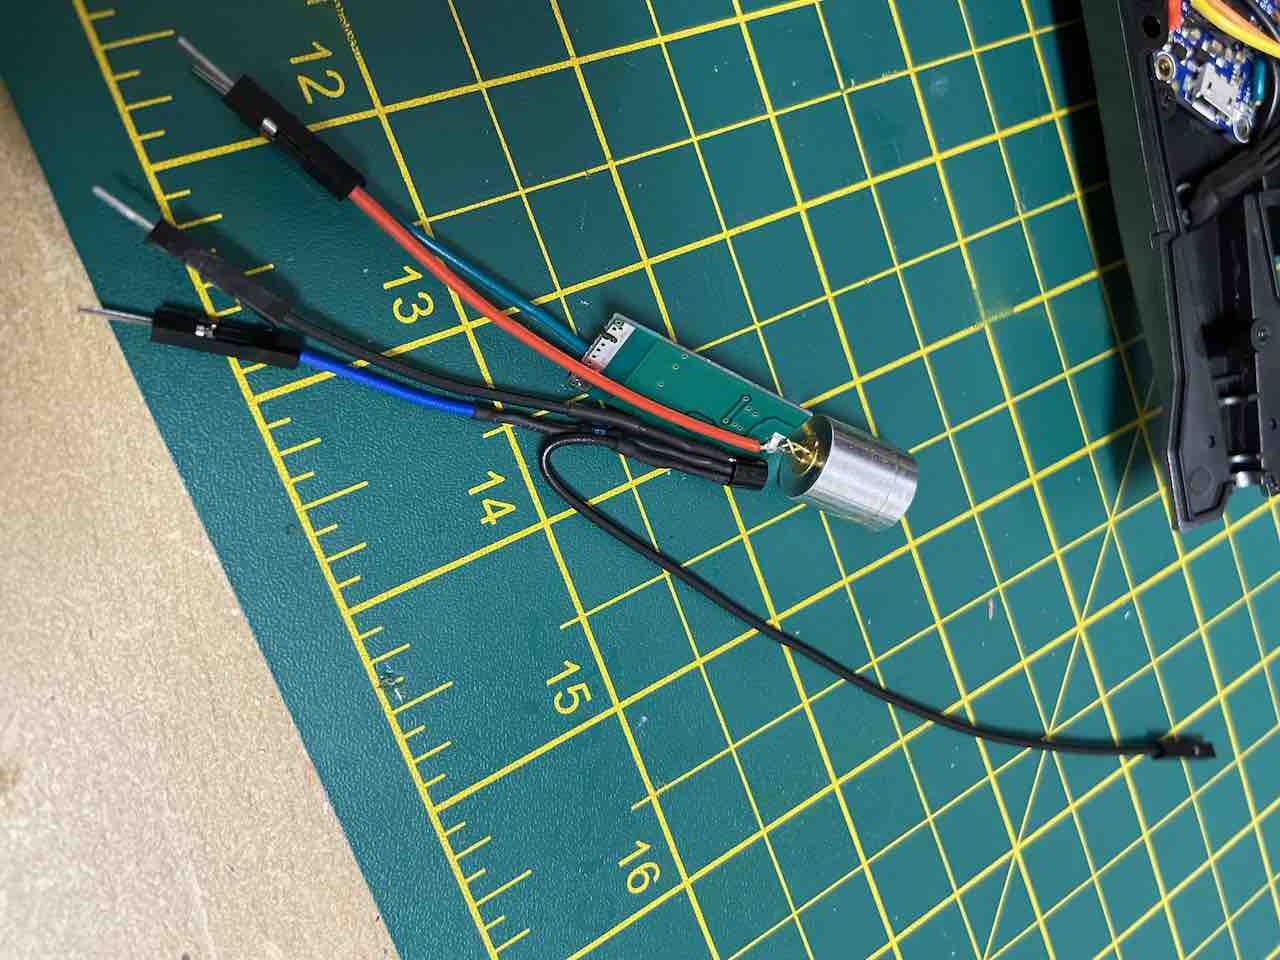
- Remove the core of a laser pen from its housing and connect +ve/-ve wires.
- Start to assemble to Laser, LED transistor and LEDs together.
- Bind the LED +ve PIN to the silver housing with insulating tape and connect the +ve to resistors and the transistor
- Create matching colour wired from the Nano to make connections easier. I used red/black for +ve/ground, green for laser and blue for LEDs.
Putting it all together
Hopefully this will help any budding modellers to make modifications to their T-800 Endoskeleton. With this rifle modification, my T-800 Eyes modification and the excellent modification from Alex McPherson it creates an epic combination.