
Yes.
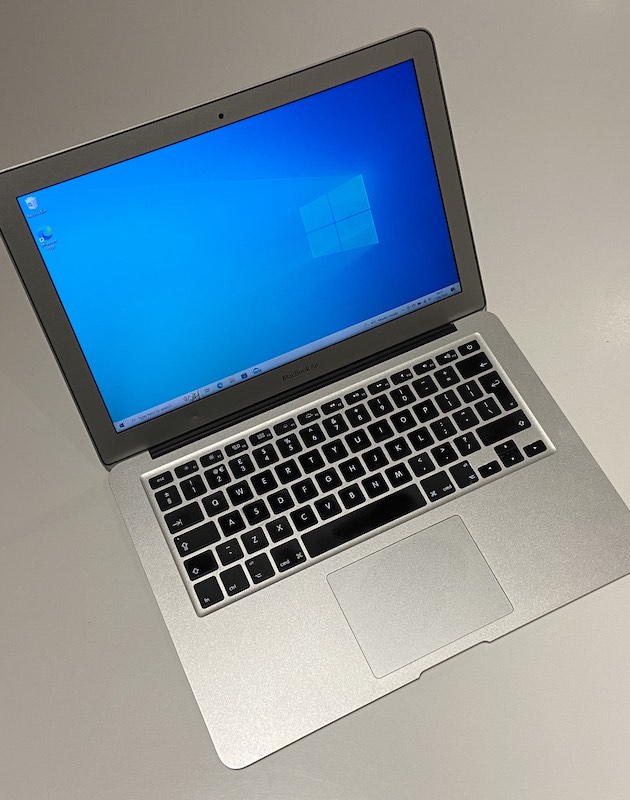
You read that right. My MacBook Air Mid 2011 running Windows 10 natively. Yes Windows 10.
Upgraded from an activated Windows 7 to get a digital Windows 10 license linked to your Microsoft account. Running natively in a Bootcamp partition, and all the Apple drivers so nothing is unrecognised in Windows Device Manager.
“A Mac, running Windows 10 natively… What! Why??!!??” I hear you say.
Well, I’ll tell you why. I’ll tell you how.
My main machine is a MacBook Pro (Retina, 15 Inch, Mid 2015) 2.8 GHz Quad-Core Intel Core i7 with 16GB RAM. It continues to serve me well running macOS Monterey (version 12.6.3 at the time of writing). Still a worthy machine for development, graphic design, email etc. etc.
For the few times I need Windows, I have it running in Parallels - but I rarely fire Windows up these days. Mostly to download and apply fixes to it.
However, I recently encountered a frustrating problem with Macs that I was unable to resolve reliably.
I have recently started 3D printing. I wanted to update the firmware on my 3D printer to a custom version with some extra features.
Updating the firmware involved saving a file onto an SD card which you place into the 3D printer and power on. Now, being a 3D printer, using custom firmware it appears particular about the update process. The guidelines suggested the SD card contain nothing but the firmware update.
I didn’t want to brick my new 3D printer beause of a failed firmware update.
Unfortunately, Macs can put one or more hidden files and directories on an external USB drive or SD card. This appeared to interfere with the firmware update process:
.Spotlight-V100
.Trashes
._.Trashes
.disk
.fseventsd
All the available instructions I find on the Internet involve anything from hacking Apple’s config to putting special files in these hidden folders to stop macOS writing to it. But I needed an SD card containing the 3D printer’s firmware and nothing else.
First thought was to use my Parallels Windows installation. I can mount the USB stick for Windows and delete the hidden files - but they keep returning. All that is required is being seen momentarily by macOS and that was enough for these hidden files to return.
Additionally, since I rarely spin up Windows on Parallels, that takes quite a while to start, then update with patches etc. All to delete a few hidden macOS files from a USB stick.
I do have several Windows XP, Vista and Windows 7 retail edition DVDs around from old PCs and laptop long since gone. How can I create a useful machine with what I have? My plan was to install Windows 7, activate it, then update it to Windows 10.
Well, I have an old MacBook Air Mid 2011 edition with a Core i7 processor and 4GB RAM. It is still functional but never used because my main machine is so much better.
How about using Bootcamp to run Windows natively? Windows 7 is very, very old but I knew you could upgrade for free. Does that upgrade process still work?
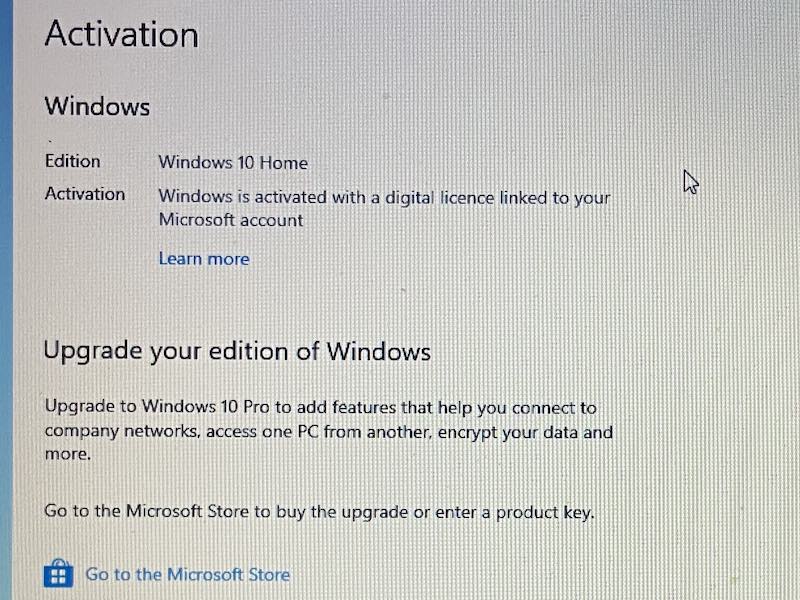
Short answer is yes! A Windows 10 upgrade to an activated Windows 7 machine will apply a digital license linked to your Microsoft account.
What is required:
- A MacBook Air. Optional DVD drive for a Windows 7 DVD.
- A Windows 7 DVD or ISO with a license that will activate.
- A Windows 10 ISO image downloaded from Microsoft.
- A USB stick (8GB).
MacBook Air
First update macOS to the latest supported by the machine. Mine was at High Sierra 10.13.2. If you are on High Sierra 10.13.1, use an update to 10.13.2 from this link.
Create a Bootcamp partition. To get the biggest partition size, a reinstall of macOS from the recovery partition helps. Backup any data and erase the disk first. Use these instructions from Apple.
Once the new macOS is installed, use Bootcamp to reduce the partition down to a small macOS partition (e.g. 50GB) and a larger Windows partition (200GB). Choose whatever size preferred.
Windows 7
Bootcamp on macOS only recognises Windows 7 and Windows 8. Use Bootcamp and a Windows 7 DVD or ISO to create a bootable USB containing Windows 7 and the Bootcamp drivers.
NB: Save the WindowsSupport folder from the Bootcamp USB stick. This is required back on the USB stick when it is reformatted for Windows 10 later.
During Widows 7 install, format the newly created Bootcamp partition as NTFS so Windows will install to it. Once installed, Bootcamp drivers install from the USB too. All good so far.
In order to upgrade to Windows 10, activate Windows 7. This is initially a problem. Windows 7 does not recognise modern security protocols (e.g. TLS 1.2). Microsoft servers (even activation servers) seem to refuse connections using older security protocols. Security has moved on, but a Windows 7 DVD/ISO has not.
There is an option to activate via telephone on the Windows 7 activation screen. Call that. It asks for a bunch of numbers from the activation screen and provides a bunch of numbers to enter. Once done, Windows 7 will report an activated status.
Windows will still refuse to update (probably due to the same older security protocols), but Windows 10 is the goal here.
Windows 10
Now create a Windows 10 USB stick to run the setup from the Windows 7 partition.
From a Mac, use these freeCodeCamp instructions with some modifications:
- From a Mac, download Windows 10 2022 - Version 22H2 from here.
- Insert the USB and use
diskutil listto find the USB device (e.g./dev/disk2). - The GUID Partition Table (GPT) disk format is not recognised by Windows 7. Erase the USB stick using a Master Boot Record (MBR) format:
diskutil eraseDisk MS-DOS "WIN10" MBR /dev/disk9
Replace/dev/disk9with your disk fromdiskutils list - Mount the Windows 10 ISO using:
hdiutil mount ~/Downloads/Win10_22H2_EnglishInternational_x64.iso
Replace~/Downloads/Win10_22H2_EnglishInternational_x64.isowith your downloaded ISO file. - Copy most of the Windows 10 ISO to your USB stick with:
rsync -vha --exclude=sources/install.wim /Volumes/windows_10_iso/* /Volumes/WIN10
Replacewindows_10_isowith the name of your mounted Windows 10 ISO. Note the/*suffix which must remain. - Install Homebrew which allows you to install and use a wimlib tool to split larger
.wimfiles:/usr/bin/ruby -e "$(curl -fsSL https://raw.githubusercontent.com/Homebrew/install/master/install)" - Install the wimlib tool with:
brew install wimlib - Ensure the destination directory is present with:
mkdir /Volumes/WIN10/sources - Split the large
install.wimfile into multipleinstall.swmfiles on the USB disk:wimlib-imagex split /Volumes/windows_10_iso/sources/install.wim /Volumes/WIN10/sources/install.swm 3800
Replacewindows_10_isowith the name of your mounted Windows 10 ISO. - Copy the
WindowsSupportfolder saved from installing Windows 7 earler onto the root of the USB stick. This is to re-install Bootcamp drivers for WIndows 10. - Eject the USB and insert into the MacBook Air.
- From the MacBook Air running an activated Windows 7, run the
setup.exefile on the WIN10 USB disk.
At this point the MacBook Air will reboot several times during upgrade. Once complete re-install the Bootcamp drivers from the WindowsSupport folder on the USB disk to ensure they are setup. Windows 10 should activate using a digital license linked to your Microsoft account:
So, my MacBook Air Mid 2011 has a new name. MacBook Air is now WinBook Air!


Comments